things you'll need:
- dry erase board
-two boards 2x1
-one 1in. hinge
-Saw
-Tape
-Spray paint
Here is what I made... everything was free for me but if you dont have such luck, it shouldnt take more than $20.


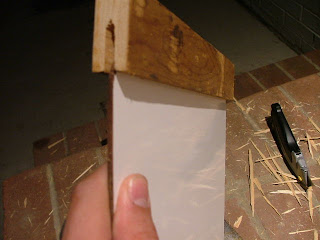
Cut a slit into one of the board so that the dry-erase board can slide into it. (a sharp saw is good)

Cut the other board into half. so its about 1x1.5 in. then attach with the hinge.
Take the clapper part off the dry erase board, mask off some diagonal lines and paint them.
Then If you want to add a stencil of your production company like I did, do it up!
Maybe spray it with some Clear coat to prevent scratches (but not the part of the board where you write)
Take some black electrical tape and mark some squares to write the Scene information.
Attach it all together and use it up!
good luck

Maybe attach a Dry erase marker on the back.